A player building a house
Raise your own viking mead halls, houses, castles, and more with our powerful construction interface. From knarrs to imposing warships, build legendary vessels to conquer the seas and discover new lands.[1]
Valheim features an extensive building system that can be utilized to design structures to meet the demands of any discriminating warrior. In addition to humble homes and outposts, players also use this building interface to make enormous bases, elaborate works of art, defences against the Creatures of Valheim, and unique tools to aid in their survival.
Starting out with simple wooden building components, players will eventually gain access to the ability to create stronger structures with various materials, including stone and metal.
Basics[]
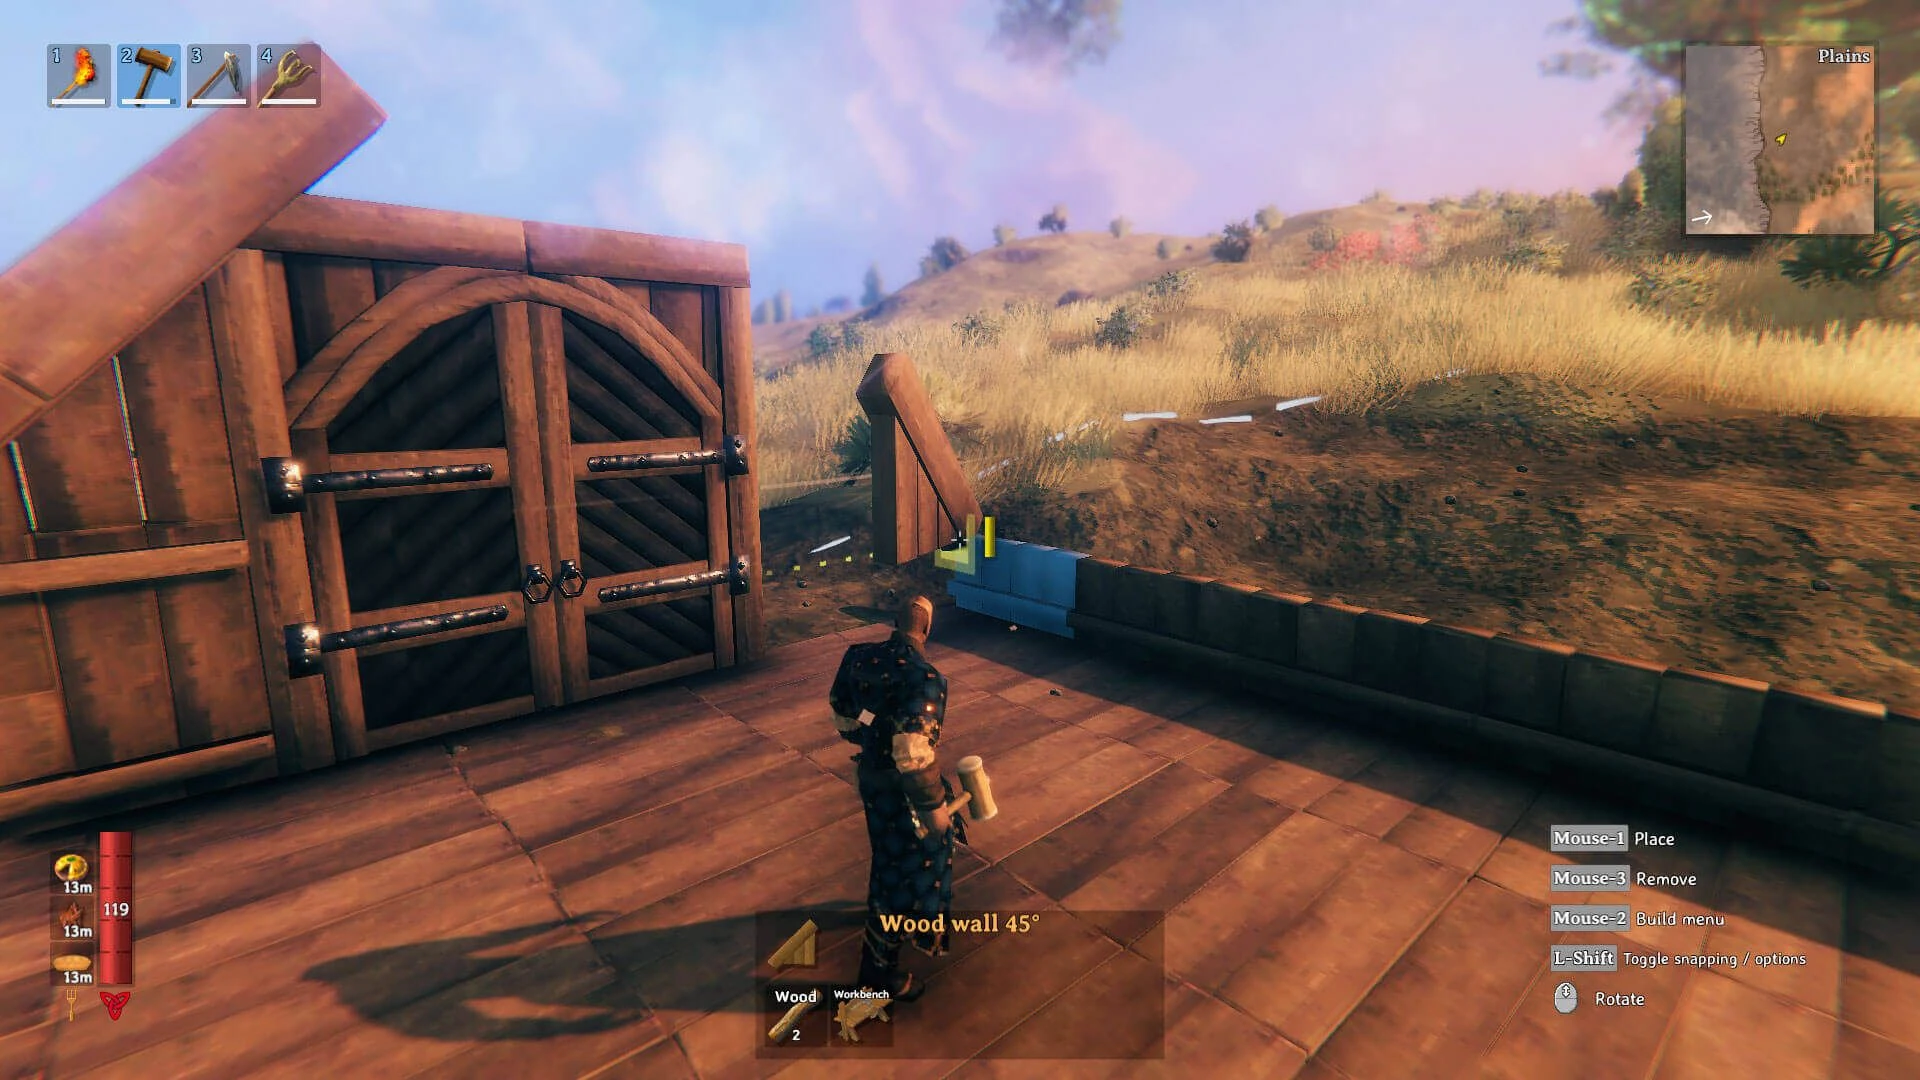
You can build using a Hammer within the working area of a Workbench.
- Press [1-8] to select the hammer in the hotbar slot
- Press [RMB] to open the build menu
- Press [Q/E] to switch Building Blocks category
- Press [LMB] to chose Building Blocks, and place it
- Press [Middle Mouse Button] to remove Building Blocks
- Scroll the mouse to rotate the Building Blocks
- Hold [Shift] to temporarily disable snapping
- Hold [Shift] then [Middle Mouse Button] to select Building Blocks you are looking at.
There are various crafting stations required to be nearby to place certain Building Blocks. These include the following:
- The Workbench, required to place most Building Blocks you have unlocked from the beginning or early on, and some late Building Blocks. The Workbench is immediately available and costs 10 ordinary wood to build.
- The Forge, required to place most building parts containing metals. The Forge requires copper to build, and becomes available once the player can mine and refine copper ore.
- The Stonecutter, required to place building parts created out of stone, such as the stone walls some abandoned buildings are made out of. The Stonecutter requires iron to build, and becomes available once the player can collect and refine scrap iron.
- The Artisan table, required to build some crafting stations that as of Patch 0.142.6 are at the end of implemented progression. The Artisan Table requires Dragon Tears to build, which must be obtained by defeating the fourth boss, Moder the dragon.
Snap Building[]
Most building components can snap to each other. This allows for quick and easy building, but can be temporarily disabled by holding the appropriate key or button. By default, this is L-Shift on mouse and keyboard, and LT+LB on controller.
Structural Integrity[]
If there is not enough support, the building parts will fall down. You may reinforce the building with walls, beams, and poles.
When you move the cursor to the building part, it shows a color range from blue, to green, to red. Blue indicates that the part is directly supported by terrain, or "grounded," and is essentially 100% stable. The closer to red on the spectrum, the less stable the part. Attempting to place additional pieces onto one that is fully red will result in the new part breaking off and dropping the resources used to construct it.
The stability of an individual building piece is determined largely by how far it sticks out horizontally from the parts that are anchored to the ground. As pieces are placed further horizontally and vertically from a stable part, their stability will gradually be reduced. Every part inherits the maximum stability from the pieces that support them. So if adding to a part that is 50% stable, the maximum stability of the new part will be at most 50%. There is also some factor of weight that contributes to stability, such that trying to place a stone wall horizontally off the side of a support will often not succeed unless the stone is supported directly from below.
Despite being a stronger material, Stone building pieces do not provide any more stability than wood parts do as a structure grows vertically.
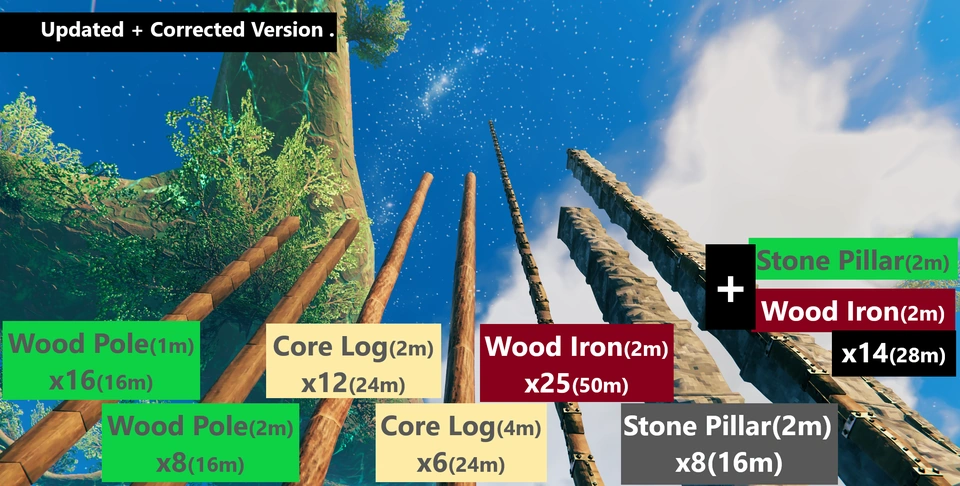
A directly vertical pole of Wood or Stone can rise 16m off the ground before it cannot support anything above it. This is true for Wood wall, Wood wall half, Stone wall 1x1, Stone wall 2x1, Stone wall 4x2, Wood pole 1m, Wood pole 2m, Stone pillar.
A directly vertical Core wood Pole Logs can rise 24m off the ground before it cannot support anything above it. This is true for Log pole 4m and Log pole 2m.
A directly vertical Wood iron pole can rise up to 50m off the ground before it cannot support anything above it.
Trees, including those planted by the player, will effectively function as "the ground" for support purposes allowing for extremely high construction.
Found on Reddit /Valheim, thanks to user/ToddGeorgeKelly/
In order to keep tall structures stable, the tallest point should be reinforced by supports that create the shortest and most vertical path possible down to the ground. It is worth considering raising the terrain as much as possible below a structure, such that the floor and walls are 100% stable (highlighted in blue when moused over). Boulders are also considered terrain when calculating stability, so parts that intersect them are considered grounded.
For a more in-depth explanation of stability taken directly from the game's code, see Building Stability.
Decay[]
If wooden building sections are not covered during rain, are not linked to a roof, or are submerged in water, they will decay to a maximum of 50% durability and will seem rotting until fixed. When exposed to rain, defensive structures do not rot decay. Stone, black marble, and crystal structures will not decay when wet or submerged.
Building the desired structure's roof first, with the appropriate supports and foundation in place, will aid with constructions lasting days or weeks if rain is a worry.
Damage[]
Player, monster, and creature attacks can all damage structures. Defensive structures will also receive minor damage while causing harm to creatures that come into contact with them.
Aggressive creatures are drawn to and hostile toward all light sources (excluding Jack-o-turnips) and crafting stations, and will try to break them if not attacking a player.
Repair[]
You can repair building parts that seem to be decaying or damaged with a Hammer. This does not cost any resources, but does consume stamina. The player must be in range of a crafting station that corresponds to the part being repaired, e.g. a Workbench when repairing a wooden part, or a Stonecutter for a stone part.
Abandoned Buildings[]
These structures are a type of point of interest that can be found to naturally occur in the world. The size, layout, and materials these structures are made of can vary greatly as each is generated from random templates.
There are different types of abandoned structures such as Abandoned Cabins, Abandoned Towers, Abandoned Farms just to name a few.
These abandoned and generated structures can contain things such as chests with items specific to the biome, monsters (usually Skeletons), monster spawners, and Vegvisirs to mark the nearest boss altar for that biome.
In the Meadows/Black Forest biome, they can also contain naturally spawning Beehives, which will drop a Queen bee and sometimes Honey when destroyed.
Players should approach abandoned villages with caution since some villages have been reoccupied by draugr and Draugr Elite who will attack the player on sight. These Draugr Villages can be identified by partial walls of sharp logs and the buzzing of the spawners inside several of the buildings as well as a general miasma and the presence of draugr both inside and outside the structures. They almost always have a large Mead Hall building that cannot be found anywhere else. There may also be a sentry in a tower armed with a bow who will snipe anything that comes near.
Base Building Strategies[]
- Building your outposts in close proximity to several biome borders grants access to varied resources and allows you to observe the territorial in-fighting of different creatures (complete with loot strewn across the terrain), but can also be dangerous.
- Many types of defenses are possible, both in the form of built objects and altered terrain:
- Creatures cannot dig through terrain, making "terrain walls" effectively impenetrable to them. Thus the perfect defense is built either with a hoe and a pile of rocks, any pickaxe or ideally a combination of the two. Be warned that terrain alterations may cause stutter just as placing objects does (press F2 to check the number of "instances" loaded).
- A hoe can be used to raise terrain while you're standing on it, allowing you to quickly erect a pillar to stand on and shoot melee enemies below. Beware that you need a workbench nearby to do this. With practice this is possible during combat.
- Most creatures never jump down from ledges (Fenring and Blobs are exceptions). A deep pit (around 3 "blocks") is also largely safe, and you can shoot enemies coming close to the ledge. Flying creatures may attack from above if you don't build a roof, however.
- Gates can be destroyed, but gaps the player jumps over when entering or exiting the base cannot. This trick can be inconvenient, however. Also note that you can scale steep terrain walls by sprinting and jump-spamming, especially when moving towards a crease (corner) for better traction, while most creatures cannot.
- The most FPS-efficient method of defense is to build on a few terrain pillars. This minimizes terrain alteration "instances" yet allows you to ignore enemies running around outside, especially if the base entrance requires a quick hop to get on. Note that returning terrain to its roughly native height doesn't remove the FPS hit (unless a true "undo terrain changes" tool is added to the game).
- Workbenches (and campfires) disallow enemy spawns in their radius, making them surprisingly useful defensive tools. You can hide these in the outer perimeter of your walls or in small pits covered with a few floor tiles to make an area safer. Workbenches also stop dropped items from de-spawning over time, however.
- Doors and gates can be used to create a toggle-able bridge for carts. Another option to defend your bridge is to hang a gate from a support above it and attach the floor piece to the gate with small gaps on the sides, causing the floor to disappear if the gate is destroyed.
- You can place gates in the water to block enemies, who will be unable to attack the gates, yet allow boats to pass when opened.
- The "Level Ground" option for the hoe uses the terrain height directly underneath you as the target altitude, though if you hold Shift while clicking it'll use the altitude of the terrain you're pointing at instead. Using this knowledge well may save you a lot of stone and work while landscaping as it only expends stamina and hoe durability.
- You can also build a "gangplank" for enemies to walk on, above your pit base, and put a campfire on it so they'll kill themselves, then catch the loot when it drops down.
- Combining a moat with a plateau-based outpost is an interesting option. An example from a private server is shown here: